
An Overview of the Shopify Integration App and its features
The Shopify App bridges Simple RFID with your Shopify store enabling seamless transmission of products, printing, orders, and inventory data.
____________________
Table of Contents
- Set Up
- Installing the App
- Configure Settings
- Features
- Copy Products to Simple RFID
- Print RFID Labels for Shopify Products
- Audit Inventory
- Compare and Sync
- Verify Orders for Accuracy
- Search for Missing Items
____________________
1. SET UP
Installing the App
- While logged into your Shopify store, download and install the Simple RFID app from the Shopify App Marketplace.
- After installing, login to the Simple RFID app with the same credentials you use to access the backend website and mobile application.
- Next, determine your unique field used to map the data which can be either your SKU or Barcode.
Settings
Next, configure your account by navigating to settings by clicking the Settings option.
From this tab you will have 4 sections to configure.
Settings > Inventory

- Extended Reports extends the report available on the History section of the Compare & Sync page to include all fields.
- Window to display open orders in inventory - This allows users the ability to extend the window to include Open Orders on the Compare & Sync page.

Settings > Products
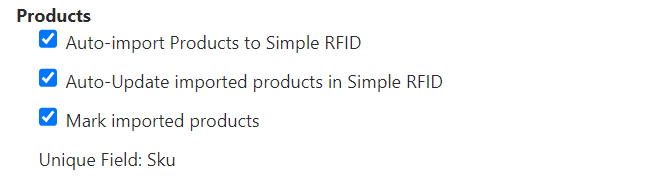
- Auto-Import Products to Simple RFID enables the automatic creation of products in Simple RFID as they are entered into Shopify. You may wish to deselect this option if you use the "Copy" button to create products from Shopify since you will likely wish to edit the SKU to be unique before adding it to Simple RFID.
- Auto-Update Imported Products in Simple RFID enables items which are edited in Shopify to automatically be edited in Shopify.
- Enabling Mark Imported Products adds the "ID" icon next to products which have been copied to Simple RFID.
- The "Unique Field" displays the key value in Shopify used to map products.
Settings > Orders

- Auto-import orders to Simple RFID - Enable this option if you wish to automatically create Sales Orders in Simple RFID to scan and verify for accuracy.
- Auto-submit order to QC - Enable this option if you wish to automatically send the orders to the mobile application.
Settings > Location Mapping
Mapping locations connects your Shopify locations to the corresponding location in Simple RFID.
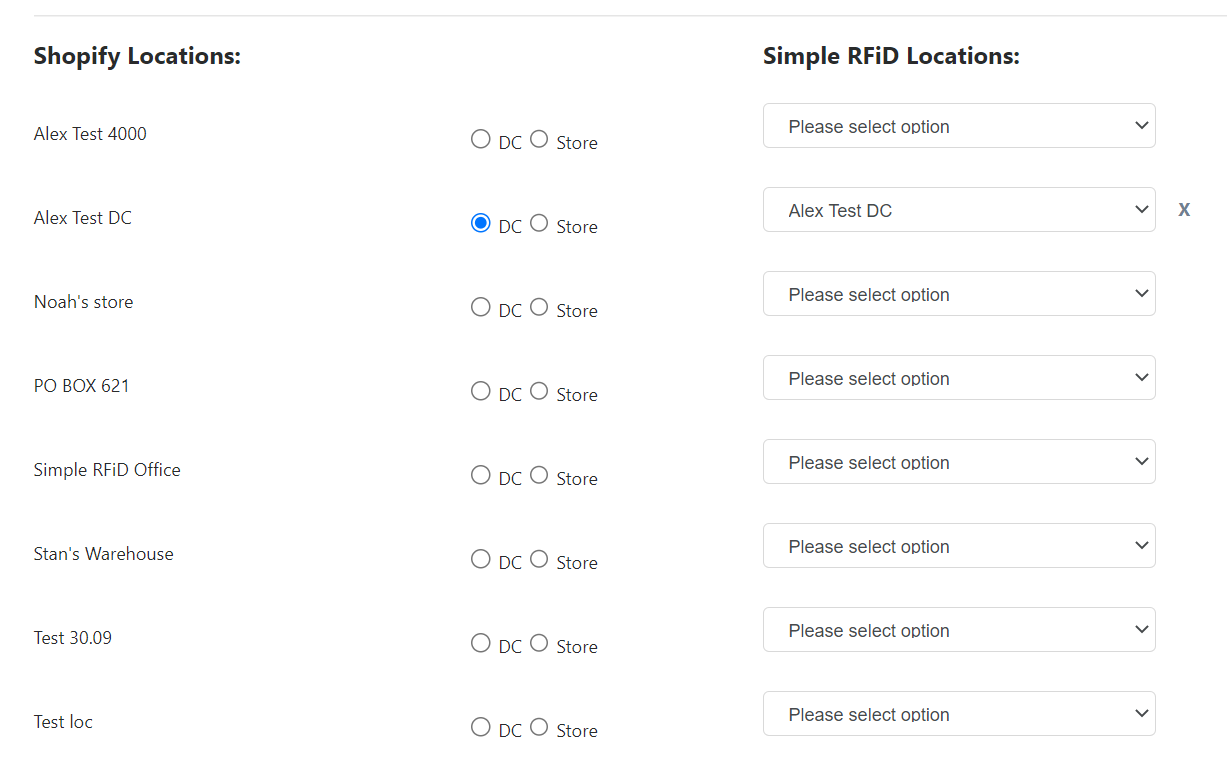
- Choose the Shopify location(s) you wish to map to Simple RFID
- To the right of the location select the radio button, Store or DC (Distribution Center) to select from the available locations created in Simple RFID, or create a new location with this location type.
- If the location is created in the Simple RFID backend it will be available in the drop-down list to be selected.
- If it has not been created you can select "Create new Store" or "Create new DC" from the drop-down, depending on your desired location type, and a location with the same name will be created in Simple RFID.
- To disconnect a location you can click the "X" to the right of the location
- Only the locations mapped will appear in the location drop-down selector for the App.

____________________
FEATURES
a. Create Products in Simple RFID
To begin we need to copy your product details from your Shopify store into Simple RFID.
The following values must be entered for Products in Shopify for them to be copied to Simple RFID:
-
- Title (Name)
- SKU or Barcode - Regardless of which field is chosen as the primary match value, it must be unique.
- Select the check-box to "Track Quantity"
- Save the product as "Active"
There are a few ways to do this:
Automatically Copy Products
- Products can be copied automatically via the Settings.
Copying Products One-by-One
- From the Products tab, search by Name and locate the Product you wish to copy. Note: Just because the product is searchable from this page does not mean that it has copied to Simple RFID. This search window displays all products in your Shopify store.
- Select the check-box to the far left to select the SKU, or select the top check-box to select all records on the page.

- If the SKU has Variants, you can choose to select only Variants you wish by clicking the > icon.

- The Variants will appear below the parent SKU, and you will have the option to select only the Variants you wish to copy.
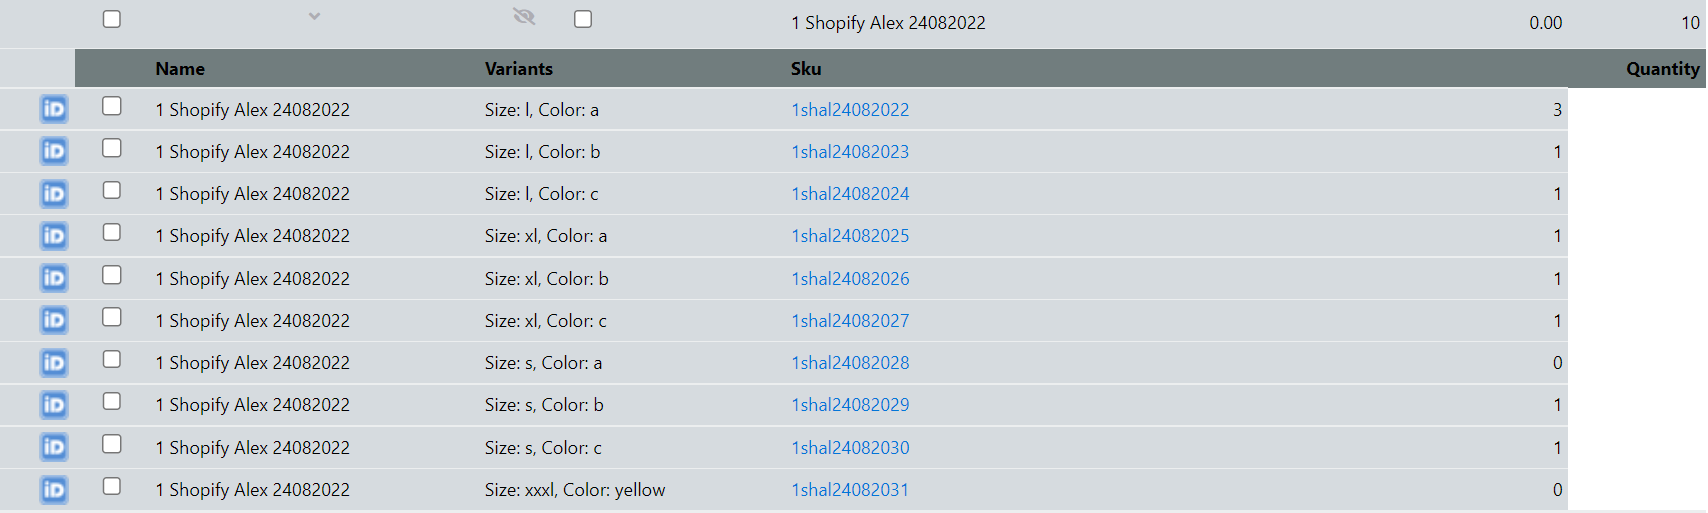
- Finally, click to "Import" the items to Simple RFID.
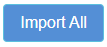
Import All
You can request all products be copied by clicking the "Import All" button.
b. Printing RFID Labels
Now that products are copied to Simple RFID you are ready to begin printing labels.
First you will need to setup and configure your printer. If your printer is not configured you will need to configure it first. You can learn how here.
Prior to being configured, or if your printer is offline it will appear gray with a red "X."

Once the printer is connected and available the icon will appear blue.

You will also need to design your label template(s) if you have not done so. You can learn how here.
Now we are ready to begin printing. Select the Printer you wish to use, and to the right select the label template.
Users can print RFID labels from three locations in the app:
-
- Printing tab
- Products tab
- Compare & Sync tab
- Printing tab
Select the Printer you wish to print to. The printer name includes the location where it is physically located and the printer model.
Select the desired label you wish to use.
- Print a single product or multiple products
-
-
- Products tab
-
-
-
- Compare & Sync / Never Printed
-
The “track inventory” checkbox enabled for Shopify products allows you to print labels for on-hand products at the quantities in Shopify from the Never Printed list.
-
-
-
-
- Print from the “Never Printed” list if you track inventory quantities inside Shopify
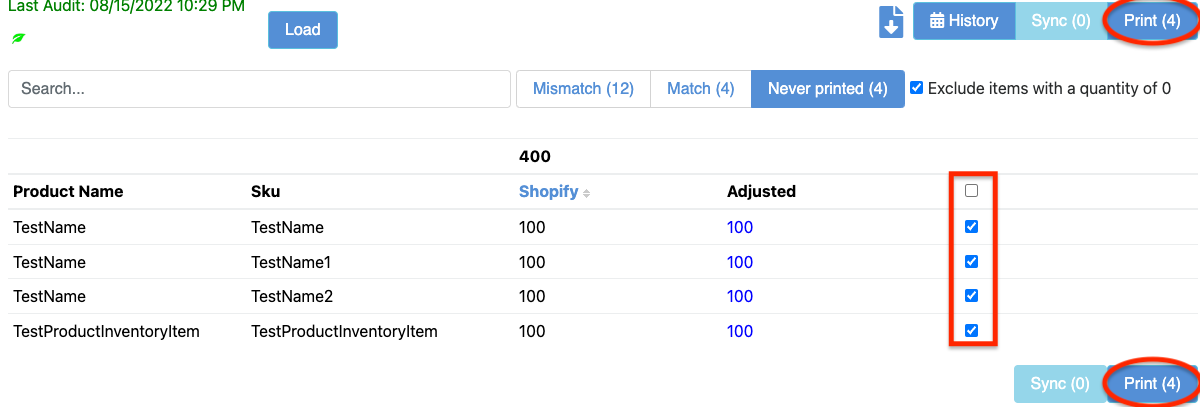
- This page provides a list of all products with inventory quantities in Shopify, but which have never been printed. This information is location-specific.
- Print from the “Never Printed” list if you track inventory quantities inside Shopify
-
-
-
____________________
c. Audit Inventory
Auditing your inventory removes items which are no longer present, and adds new and missing items. It also removes Closed/Fulfilled Orders.
After completing the Audit and loading the Compare & Sync page, the RFID column will contain all on-hand inventory, and the Orders column will contain only Open/Unfulfilled orders.
It's important to understand how fulfilling items before or after the Audit will affect your results.
Fulfilling Items Before an Audit
If you choose to Fulfill items before an Audit it is critical that these items not be scanned during or after the audit, otherwise the fulfilled orders will clear but the items will be added back into the inventory, inflating the inventory.
Fulfilling Items After an Audit
If you choose to fulfill items after an audit you must be aware that the order will remain in the orders column (showing Fulfilled status) until the next audit.
______________
d. Compare & Sync
After completing an audit and loading the Compare & Sync page, your items will be grouped into three groups, Never Printed, Match, and Mismatch.
-
-
- Never Printed - Contains a list of all items which haven't been printed with the quantities listed in Shopify as available to print.
- Match - Match shows
- Mismatch Instances where Available does not match Shopify.
-
______________
Match
A SKU appearing on the Match list indicates:
-
-
- RFID inventory (which is then pulled from the Verified status)
Minus - Orders which can include Open/Unfulfilled and Closed/Fulfilled
- Equals Available
- RFID inventory (which is then pulled from the Verified status)
-
-
-
- When the Available quantity matches Shopify, the products appear in the Match list
-
____________________
Mismatch
Items appearing on the Mismatch list do not match the published Shopify counts grouped into three categories, Deflated, Inflated, and Out of Stock.
-
-
-
- Deflated - The Deflated list groups all items where Shopify inventory is less than what is Available and must be increased to list all available stock quantities on Shopify.
-
-
Solution - Sync your Shopify inventory to match your available quantity.
Caution: Ensure that you have not failed to properly remove an item from inventory so that you don’t artificially inflate your list.

Steps:
-
-
-
- Select the green Deflated filter to only display Deflated items
- Select the top checkbox to add all records
- Click the blue Sync button
-
-
Result: Shopify quantity is updated to match the Available amount, and all Deflated items will now appear on the Match list
-
-
-
- Inflated - Inflated inventory means that you have more inventory listed on Shopify than what you have available and can mean one of two things:
-
-
Scenario 1 - You have items that still must be tagged, scanned, and added to inventory so that the Available quantity matches Shopify.
Steps:
-
-
-
- Print RFID labels for these items from the Compare & Sync tab.
- Click on the orange Inflated filter.
- The software suggests printing the difference in quantity between Available and Shopify.
- Click the blue Print button.
-
-
Result: Print RFID labels for the difference in quantity between Available and Shopify.
-
-
-
- Perform and upload an Add RFID scan
- Reload the Compare & Sync page
-
-
Result: Product will appear on Match with your Shopify quantity reduced to match your available quantity.
OR
Scenario 2 - Inventory is inflated! This means you are listing product quantities for sale that you do not have in stock, and you run the risk of selling what you don’t have. If this is the case, you must reduce your Shopify quantity to match your available quantity.
-
-
-
- Click products you desire to adjust from the Inflated list
- Click the blue Sync button
-
-
Result: Shopify inventory will be reduced to match the Available quantity, and the items will appear on the Match list
-
-
-
- Out of Stock - Any printed product with an RFID quantity of “0” will appear on the Out of Stock list. Out of Stock may mean one of two things:
-
-
Scenario 1 - You have inventory that has not been tagged and scanned. When this is the case, the labels can be immediately printed for inventory in the quantity listed on Shopify.
-
-
-
- Click the Out of Stock filter to display all items for which you wish to create RFID labels.
- The software suggests printing the difference in quantity between Available and Shopify.
- Click the blue Print button.
-
-
Result: RFID labels are printed for products and quantities
-
-
-
-
- Apply RFID labels to the product
-
-
-
-
-
-
- Scan and upload data
-
-
-
-
-
- Load the Compare & Sync page again
-
-
Result: Available count will match Shopify quantity, and item (s) will appear on the Match list
OR
Scenario 2 - The Product is sold out, and there is no available stock, but you show a quantity in Shopify.
The Shopify inventory quantity should be set to “0” to prevent customers from purchasing items not in stock.
-
-
-
- Select the Out of Stock tab
- Select the check boxes next to the items which are Out of Stock
- Click the blue Sync button
-
-
Result: Shopify quantities will be set to “0”.
Note: To prevent sales from occurring once the inventory reaches zero, you must confirm that the checkbox “Continue selling when out of stock” Is left unchecked
____________________
____________________
e. Verify Orders for Accuracy
All orders in Shopify are copied to Simple RFID to allow users to perform a Quality Control, or “QC” check, to verify orders are packed correctly before shipping.
Verifying an order captures each product’s unique serial number, linking the serial numbers to the order.
Orders must be Open to be audited for Verification.
Note: The Order controls on the Settings tab should both be checked. This allows Orders to be imported automatically, and their status moved to Submitted for QC.

Order and QC Statuses
There are 2 Order statuses and 4 QC Statuses.
Order Statuses
-
-
-
-
- Open
- Closed
-
-
-
All QC Statuses relate to Open Orders. The 4 QC Statuses are:
-
-
-
-
- Submitted for QC
- Processing in QC
- Failed QC
- Passed QC
-
-
-
- Submitted for QC - This status contains all Orders sent to the Android / iOS mobile app to be verified for accuracy.
- Processing in QC - This status moves an Order into an operator’s queue to verify the order.
- Failed QC - This status displayed instances when the order was not verified successfully.
- Passed QC - This status displayed instances when the order was verified successfully.
Verification Steps
To Verify an Order once it has been submitted to the Android / iOS mobile app:
-
-
- Log in to the mobile app
- Click on the Sales tab
- Click on the Submitted list
- Locate the desired order:
- By searching the list of Submitted Orders
OR - If you use Pick Sheets to pull Orders, you may click on the “Filters.”
-
Verifying the order also removes the items from your inventory. It links the serial numbers related to the product to the Customer who purchased it. This can help connect Purchase Orders to product recalls and defects.
____________________
f. Search for missing items
____________________
Common Questions (Broken down by section)
Inventory Questions
How do I audit my inventory for errors?
What is inflated inventory?
What is deflated inventory?
What is out-of-stock inventory?
Printing Questions
What is the best way to print tags?
What’s the best way to manage tagging new products?
What is the best way to print tags for existing inventory?
Order Questions
How do I verify orders for accuracy?
How do I use RFID to locate a missing item?