
The following is a guide to installing, connecting, and configuring a fixed reader.
_____________________________________________________________Table of Contents
1. Hardware Components and Installation Guidelines
2. Establish a Connection with the Reader
3. Install the Fixed Reader Client
4. Notify Simple RFID that the reader has been connected
5. Verify Reader is Sending Data to Simple RFID
_____________________________________________________________
1. Hardware Components and Installation Guidelines
The following items are included in the shipment from Simple RFID
|
|
|
|
|
|
|
|
|
Coax cable communicates radio signal from Antenna to Reader. The installer may cut and re-end the coax cable if needed. IF THE INSTALLER BRINGS COAX: (Needed cable length - Series)
Connectors*:
*Connectors based upon antenna |
|
|
|
|
|
|
|
|
|
|
|
|
|
|
|
|
|
|
|
|


Installation Guidelines
Reader
- Place the reader in a location that can be accessed but is out of the way.

Antenna
- Place the antenna up to 15' away from the product being scanned. The antenna signal is cone-shaped, so items placed near the antenna may have a hard time being scanned.
- We suggest the opposite wall from the product being scanned towards the ceiling.
- This image shows the intended placement of the reader and antenna in a medical facility.

- This image shows medical products stored in plastic cubbies to be scanned and placed on the opposite wall.

- Image of Mounted Antenna

- This image shows the intended placement of the reader and antenna in a medical facility.
- You will want to angle the antenna face to point at the product.
-jpg.jpeg?width=435&name=image000000%20(1)-jpg.jpeg)
_____________________________________________________________
2. Establish a Connection with the reader
Option 1 - Connect the Reader directly to a PC (If the PC is near the reader)
-
-
- Connect the Reader's Ethernet port to a PC directly via the Ethernet cord
- Connect the Reader's AC Power power supply to the reader and plug it in
- Open a Browser window, enter the default IP address 169.254.1.1, and click Enter
- Verify that you can locate the reader
- Login to the Reader:
- Login: root
- Password: impinj
-
Option 2 - Via the Network
Via the Network, there are two ways to locate the reader
.A. The network administrator needs to provide the reader's current IP address (the reader uses DHCP so that it will have a temporarily assigned IP). The Network admin will also provide an available IP address set as Static.
How to Set a Reader's IP Address to Static
Once the IP has been changed to Static open a web browser and confirms that you can access the reader using this new IP.
B. Via the Reader's Host Name
Search the Reader's Hostname by opening a browser window and searching:
If the Speedway reader or Impinj gateway is connected via a router, point your PC web browser to:
| Impinj Product | URL |
| Impinj Speedway reader | http://speedwayr-xx-xx-xx or http://<IP address> |
| Impinj xPortal gateway | http://speedwayr-xx-xx-xx or http://<IP address> |
| Impinj xArray gateway | http://xarray-xx-xx-xx or http://<IP address> |
| Impinj xSpan gateway | http://xspan-xx-xx-xx or http://<IP address> |
Note 1: In the above table, "xx-xx-xx" are the last 6 characters of the MAC address of your device.
If the Speedway reader or Impinj gateway is connected directly to the PC, point your PC web browser to:
| Impinj Product | URL |
| Impinj Speedway reader | http://speedwayr-xx-xx-xx.local or http://<IP address> |
| Impinj xPortal gateway | http://speedwayr-xx-xx-xx.local or http://<IP address> |
| Impinj xArray gateway | http://xarray-xx-xx-xx.local or http://<IP address> |
| Impinj xSpan gateway | http://xspan-xx-xx-xx.local or http://<IP address> |
Note 2: In the above table, "xx-xx-xx" are the last 6 characters of the MAC address of your device.
If you are unable to locate the reader using the Host Name, we will need the Network Admin to provide a current IP address (which is dynamic) which will need to be set to Static.
The Network Admin will need to provide a possible Static IP that you can use (In many cases, this will be the same IP address that is provided which is Dynamic)
_____________________________________________________________
3. Install Simple RFID Print Client
Download and Install the Simple RFID Fixed Reader Client from Simple RFID. The Fixed Reader Client can be installed on either a PC or a Server inside the Network.
- Fixed Reader Client Download
- Please record the name of the PC or Server to provide to Simple RFiD
_____________________________________________________________
4. Notify Simple RFID that the reader has been connected
- Record the name of the PC (This will allow Simple RFID)
- Install AnyDesk.com to enable remote access
- If possible, set a password for unattended access (as simple123)
- Send new Static IP Address of Reader
- Email the PC/Server name and AnyDesk ID to support@simplerfid.com
_____________________________________________________________
5. Verify Reader is Sending Data to Simple RFID
After the reader is connected to the account, you will need to enable the reader.- Enable Reader
- Click the "Change" button
- Then select the "Enabled" checkbox

- Identify where the reader is connected
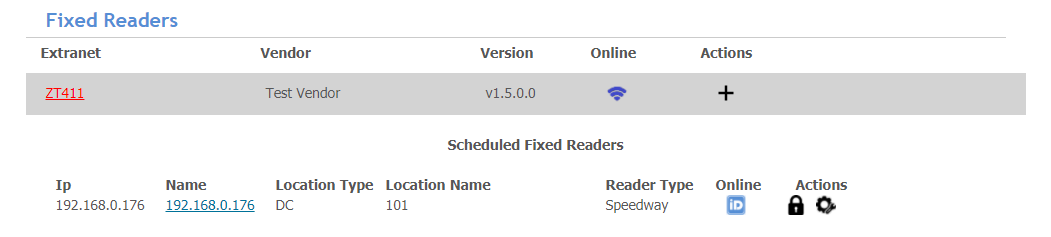
- Go to Settings > Fixed Readers
- On the Fixed Reader page, locate the reader
Ensure the reader is connected to the desired location. If it is not, you must assign it to this location.
- Assign Reader to New Location:
- Click the lock icon on the right
- Select the Location Type and Location Name
- Click the Lock icon to assign
- Navigate to where the reader is connected and confirm it is reading. The easiest way to do this is to go to the location's History tab.

- On this tab, you will see a record containing the reader's name as the User.

________________________________________________________